Row-Level Security (RLS) in Power BI is a feature that restricts data access for users based on roles, allowing them to view only specific data relevant to them. This is especially useful when you have diverse user groups accessing the same report but need to limit each user group’s access to only the data they are authorized to see, improving data confidentiality and personalization.
Understanding Row-Level Security in Power BI
Definition and Purpose of Row-Level Security
Row-Level Security (RLS) in Power BI is a feature that allows data access control at the row level within a dataset. Its primary purpose is to restrict data visibility based on user roles or attributes, ensuring that users only see the data they are authorized to access.
Benefits for Data Protection and Compliance
Row-Level Security offers several key benefits:
- Enhanced data protection
- Improved compliance with data regulations
- Simplified report distribution
- Increased user trust
| Benefit | Description |
| Data Protection | Prevents unauthorized access to sensitive information |
| Compliance | Helps meet GDPR, HIPAA, and other regulatory requirements |
| Simplified Distribution | Allows sharing of a single report with multiple user groups |
| User Trust | Builds confidence in data handling practices |
Common Use Cases in Business Environments
Row-Level Security is widely applicable across various business scenarios:
- Sales teams: Restricting access to regional data
- HR departments: Limiting visibility of employee information
- Financial institutions: Controlling access to customer account details
- Healthcare providers: Ensuring patient data confidentiality
- Multi-tenant applications: Segregating data for different clients
By implementing RLS, organizations can maintain a single version of the truth while ensuring that sensitive data remains protected and accessible only to authorized individuals.
Define Roles and Rules in Power BI Desktop
- Import or Connect to Data:
- Import data into your Power BI Desktop report or set up a DirectQuery connection.
- Note: If you’re using an Analysis Services live connection, you’ll need to set up roles directly in the Analysis Services model instead of in Power BI Desktop.
- Open Manage Roles:
- From the Modeling tab, select Manage Roles.

- From the Modeling tab, select Manage Roles.
- Create a New Role:
- In the Manage roles window, select New to create a new role.

- Name the role (for example, “EastRegion” or “HRViewOnly”) and press Enter.
- Note: Avoid using commas in role names.
- In the Manage roles window, select New to create a new role.
- Choose Tables and Set Filters:
-
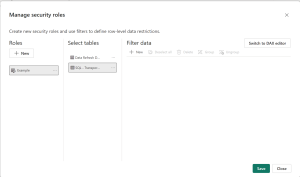
- Under Select tables, pick the table(s) you want to apply RLS to.
- Under Filter data, you can define filters to restrict data for this role. The default editor provides a dropdown interface that creates expressions returning true or false values.
- Use the DAX Editor (Optional):
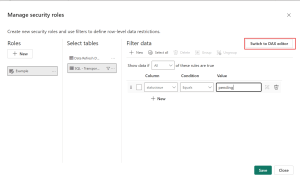
- If needed, switch to the DAX editor by selecting Switch to DAX editor. This is useful for setting up more complex or dynamic rules.
- If needed, switch to the DAX editor by selecting Switch to DAX editor. This is useful for setting up more complex or dynamic rules.
-
-
-
- For example, you can use expressions like [Entity ID] = “Value” or dynamic functions such as username() and userprincipalname().
- Note: In Power BI Desktop, username() follows the format DOMAIN\username, but in Power BI Service and Power BI Report Server, it uses the User Principal Name (UPN).
- Switch Editors if Necessary:
- You can switch back to the default editor by selecting Switch to default editor.
- Changes made in either editor will generally carry over. However, if you define rules that only work in the DAX editor, you may receive a warning that some information could be lost if you switch back.

- Enable Bi-Directional Cross-Filtering (Optional):
- By default, RLS filters apply single-directional filtering, even in bi-directional relationships.
- To enable cross-filtering in both directions for RLS, select a relationship and check the Apply security filter in both directions .
-

-
-
- Note: If a table has multiple bi-directional relationships, you can only apply this setting to one.
- Save:
- Once your roles and rules are defined, select Save.
- Assign Users in Power BI Service:
- Publish the report to the Power BI Service.
- Assign users or groups to the roles under the Security section of the dataset settings in Power BI Service.
-
Steps to Manage Security in Your Semantic Model in Fabric
- Select the More options menu for a semantic model. This menu appears when you hover on a semantic model name.
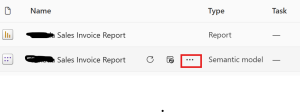
- Select Security.

-
- Note: Only contributors and higher workspace roles can see and manage Security settings.
- Add Members to a Role:
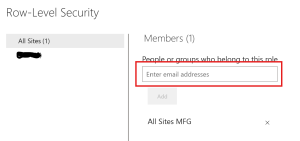
- In the Role-Level Security page, type in the email address or name of the user or security group to add them to a role.
- Supported groups include:
- Distribution Groups
- Mail-enabled Groups
- Microsoft Entra Security Groups
- Remove Members:
- To remove a member, select the X next to their name.
- Validate the Role in Power BI Service:
- Next to the role, select More options (…), then Test as role.
- This opens the report published with this model, if available, to view RLS in action.
- Use Now viewing as to test different roles, combinations, or specific users.
- To view other reports using the model, select Viewing in the header to choose another report in the same workspace.
- Return to Normal Viewing:
- To exit role testing, select Back to Row-Level Security.
Key Limitations of Row-Level Security (RLS) in Power BI
- RLS roles can’t be defined for live connections to SSAS or Azure Analysis Services; they must be configured within the Analysis Services model.
- Microsoft 365 groups aren’t supported for RLS, and groups created within Power BI can’t be added to roles.
- It doesn’t apply to users with admin, member, or contributor access in a workspace.
- The “Test as role” feature only works on reports, not on dashboards, and can only test reports within the same workspace.
- RLS settings aren’t compatible with “Publish to Web” or any report embedded without authentication.

